Accessing OData from Visual Studio Online

Summary


Visual Studio Online is cloud version of TFS which we can connect using Visual Studio to retrieve projects collections and work items. The VSO does not give access to any backend database like CRM tools and exposes its data through REST API and ODATA.

Requirement : Pull project and work item collection from VSO and store the same in SQL Azure, which will be used for analysis.

Solution : Create SSIS package to connect to VSO using OData connection and pull VOS data like project , work items etc and connect to SQL Azure and store the desired data.

Prerequisite


Steps to create SSIS package

Create connection to Azure and VSO

Open SSDT and create new SQL Server Integration Service project, add a new package and go to the connection manager and right click, you will get the below window.

After clicking on new connection it takes to another window where we have to select OData.


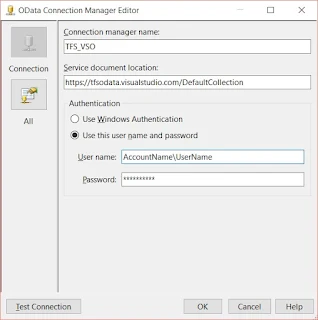
Your connection details should look like the below for VSO.

AccountName - The collection path user is assigned to.
Password - The alternate password set in VSO.
AccountName - User account to login to VSO


Similarly create SQL Azure - Oledb connection which looks like the below one


Understand the VSO Odata service location
The VSO odata service is exposed at https://tfsodata.visualstudio.com/ which has detailed spacification of specifying the URL for different object collection.

Next is we can drag the Odata source and place in Dataflow task so the final look will be as below.


The WorkItem source details looks like shown below.


SSRS Configuration for Sharepoint

Step 1: Configuring SQL Reporting Services – Web Service URL

Simply go to Reporting Services Configuration Manager and choose Web Service URL and populate the following needed information. The fields are named properly so I guess there is no need for further explanation. What this does is that it configures the IIS for you depending on what Virtual Directory names you had declared.

Step 2: Configuring SQL Reporting Services – Create a Report Database

Same here, fields need no further explanation except for one which is Native Mode and SharePoint Integrated mode which I will explain below.
Choose create a database or if you already have one choose an existing one. For this example, we will create a new one:

Connect to the database where you want your Report Data to be stored:

Give it a Name and a Report Server Mode.
With SharePoint Integrated Mode the report RDLs are stored on SharePoint and not in the Report Database. For this instance, we will use the SharePoint Integrated Mode:

Specify the credentials that the report server will use to connect to the database.

Review your configuration.

Then wait while it's configured.

Step 3: Configuring SQL Reporting Services – Create a Report Manager URL

What this does is that it configures the IIS for you depending on what Virtual Directory names you had declared.

That’s it. At this point, your report server is configured for SharePoint Integration 2010.

Step 4: SharePoint Integration Configuration – Reporting Services Integration

Simply go to SharePoint 2010 Central Administration, then General Application Settings, then choose Reporting Services Integration.

Now populate the fields using the Web Service URL you had configured a while ago on Step 2 of this guide.

Once done, you will see the Activation State message.

Step 5: SharePoint Integration Configuration – Add a Report Server to the Integration

Now add the report server by putting the Server Name and the Server instance.

At this point it's all done, all you have to do now is try it out.

Step 6: Verify by Checking the Server and Uploading a Report

To verify if it's now integrated, go to Site Settings on your SharePoint Site, then Site Collection Features.


Check if the Report Server Integration Feature is Active, if not just click activate:

Now try to use the SQL Server Reporting Services Webpart:


Or you can also upload a report from a library.


Step By Step Guide to Change Report Server Look and feel

CHANGE THE CONFIGURATION ENTRY IN REPORT SERVER FOLDER

·        Navigate to the report server folder which “C:\Program Files\Microsoft SQL Server \ MSRS_vv.MSSQLSERVER\Reporting Services\ReportServer”
·        Open the rsreportserver.config file and add the below entry below <Configuration>
·        <HTMLViewerStyleSheet>Pink</HTMLViewerStyleSheet> remember that Pink is will be your CSS file name which we will create in next step.
·        Save and close the file.

ADD Pink.css file in the Style folder

·        Open the Styles folder in \ReportServer and create a file named Pink.css
·        Copy the content of HTMLViewer.css to file name Pink.css.
·        Now you can modify the content of Pink.css according to your ease.
·        Suppose if you want to change the Parameter Frame color the navigate to .ParameterFrame section and modify.
e.g.

.ParametersFrame
{
/* make background ! */
background-color:burlywood;
border1px solid maroon;
width100%;
}

Accessing your newly created CSS in ReportServer

Try using the below command to access your new CSS in Report Server

http://localhost/reportserver?rc:Stylesheet=Pink


T-SQL LEAD LAG and SUM function based query

  Query on T-SQL window clause Below is the sales table Order_Date Name Product SubCategory ...